Saturday, October 27, 2012

Cinnamon Cream Cheese Pumpkin Muffins


Fall=pumpkin EVERYTHING! A couple weeks ago, I used this pumpkin bread recipe to make a batch of yummmy of fall flavored bread. To enhance the flavor, I made a cinnamon cream cheese glaze to go on top. It was delicious. I don't have mini loaf pans, so the bread was a bit thick for something so decadent and flavorful. I thought it might be fun to try making them as muffins. So I started playing around. The result? These little cream cheese filled pumpkin muffins. My husband was ALL over them. He absolutely loved them... so I'd say they're a hit. :)

For the original bread recipe click here. Below is my recipe, with the substitutions and additions I made. As I previously stated in my chicken fried quinoa recipe, I do a lot of cooking by taste. So when you see a ** next to something.. just know the amount may need to be more or less depending on how yours tastes. :)

Cinnamon Cream Cheese Pumpkin Muffins

1 15 oz can pumpkin puree
2 tablespoons Coconut Oil
1 cup Sorghum
2-3 tablespoons Agave nectar**
2 eggs
1-1/2 cup and 1 tablespoon of all-purpose flour
1/2 teaspoon baking powder
1/2 teaspoon baking soda
1/2 teaspoon salt
1/2 heaping teaspoon ground cinnamon
1/2 heaping teaspoon ground nutmeg
1/2 heaping teaspoon group cloves
1/2 heaping teaspoon pumpkin pie spice

Cream Cheese Filling

1 8 oz package of cream cheese
1/4 cup agave nectar **
1/2 teaspoon vanilla
1 tablespoon cinnamon**

-*IN ADVANCED* Prepare cream cheese filling by mixing ingredients together and refrigerate for at least 1 hour.

-Preheat the oven to 350 degrees. Prepare muffin pan with cupcake liners.

-In a large bowl, mix together the pumpkin, oil, sorghum, agave, and eggs. 


-In a separate bowl, combine the flour, baking powder, baking soda, salt, cinnamon, nutmeg, and cloves. 


-Stir flour mixture into the pumpkin mixture until well blended. 


-Using cookie scoops, spoon enough of the batter to thinly cover the bottom of the cupcake liner. Put a dollop of the cream cheese filling, then cover with remaining dough in scoop.


-Bake in preheated oven for 20-24 minutes.

Thursday, October 25, 2012

Fall Fun


One of my favorite fall memories as a child was doing pumpkin carvings. Carving pumpkins is always looked at as a way of celebrating halloween by putting scary faces and such on it. But it doesn't HAVE to be that way. You can carve whatever you want onto a pumpkins! And in my opinion... they look much better without the faces. :) It came to my attention that my husband had never carved a pumpkin before, since it has always a favorite memory of mine, I wanted to share it with my favorite person! :)

Our first pumpkin we made said "Huskers."


Finished Husker pumpkins! 
We had so much fun doing the first pumpkin... we decided to do 2 more! :)

All ready to be traced! 
Andrew was a pro by the time we got to the last pumpkin! 
Tracing the design
Our handy dandy carving tools! 
After Andrew traced it, I cut it out...
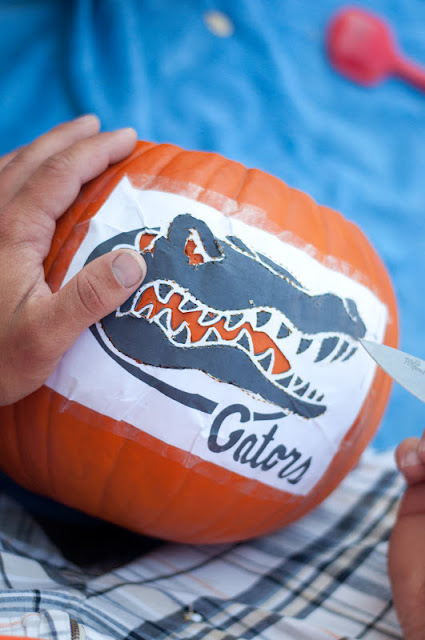
...while he moved on to the next pumpkin! Since we did a husker pumpkin, we thought it was only appropriate to do a Gator one as well. :)
We did this one a little differently, because it it was so detailed, and it would be hard to get it to stay together cut out.

We traced it completely with a knife so that we could take off the top layer.


Finished! :)

That night we put a candle in it. Turned out pretty sweet, huh??! :)
Happy Fall Y'all! :)